Customizing Visual Studio for PowerShell users
published: 10 May 2012
Why?
I find this a very useful customization to Visual Studio to run project specific tasks from PowerShell while developing. For example I have PowerShell .ps1 scripts in a Tasks or Deployment solution folders that do things like:
- Refresh nuget packages because I use nuget without committing packages (Update: Nuget.org have finally fixed this!)
- Seeding my Database/ RavenDb Document stores
- Testing my Build/ Automated test scripts outside of CI
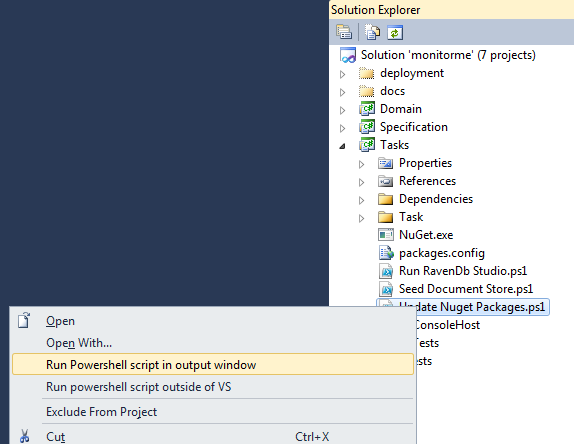
It’s nice to be able to right-click them (or use a shortcut key) to execute them in place just like this:
So on to how to set it up:
##
Step 1: Adding “run powershell script” as an external tool
-
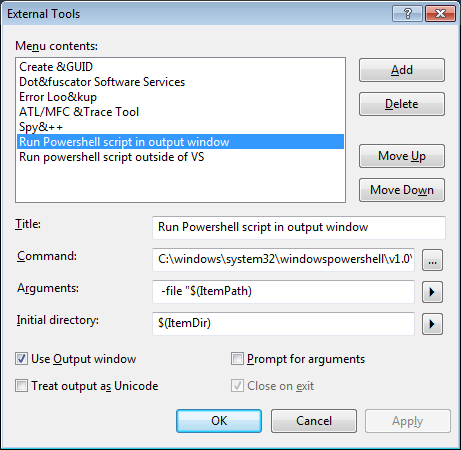
In Visual Studio go to the menu: Tools External Tools - Click the “Add” button
- Add the following form values:
- Title: “Run Powershell script in output window”
- Command: “C:\windows\system32\windowspowershell\v1.0\powershell.exe”
- Arguments: “ -file “$(ItemPath)”
- Initial Directory: “$(ItemDir)”
- Tick “Use Output window”
- (Close on exit will now be automatically on)
- Click the “Apply” button
- Click the “Add” button
- Add the following form values:
- Title: “Run powershell script outside of VS”
- Command: “C:\windows\system32\windowspowershell\v1.0\powershell.exe”
- Arguments: “ -file “$(ItemPath)”
- Initial Directory: “$(ItemDir)”
- Don’t tick “Use Output window”
- Tick “Close on exit”
- Click the “Ok” button
They should look something like this:
Step 2: Weird Step, trust me!
Check the index position it is in the external tools list. By default mine are at positions 6 and 7. (I think by default Create GUID is no. 1!)
Step 3: Hook it up to the context menus
-
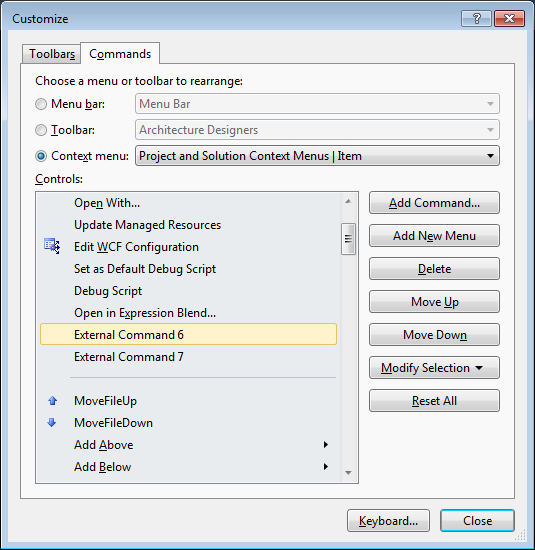
Go to the menu: Tools Customize Commands - Click the “Context menu” radio option
-
Scroll down to “Project and Solution Context Menus Item” (nightmare long menu, type “Proj” to get roughly to the right place) - Click the “Add Command” button
- Select the category: “Tools” and Command: “External Command 7” (or whatever your position is you got from the “Weird Step 2”)
- Hit the “Ok” button
- Then to set up the 2nd command:
- Select Category: “Tools” and Command: “External Command 8” (or whatever your position is for the other one)
- Hit the “Ok” button again
- Move them around till you are happy with their order (I usually put them somewhere below “Open With…”)
Step 4: Add your keyboard shortcuts
-
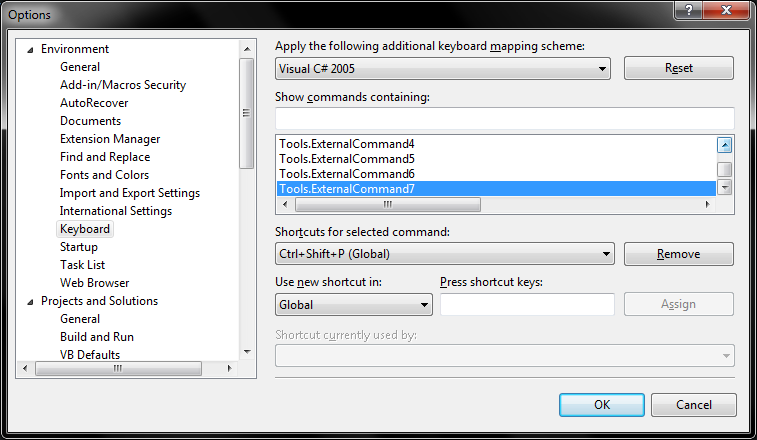
Go to the menu: Tools Options -
Select the Environment Keyboard section - Find the Tools.ExternalCommandN item in the list (nightmare long list again, type “Tools” to get you roughly there again)
- Select your shortcut key for each command: I like <CTRL> <SHIFT> <P> and <CTRL> <SHIFT> <ALT> <P> respectively
You are all done, enjoy your PowerShell efficiency!
##
What kind of PowerShell scripts do you find useful to run straight from Visual Studio?